Redis Cache Deletion Performance
When developers of high traffic applications are confronted with performance degradation, often the first course of action is to implement some flavor of data caching mechanism. The level of ...
When developers of high traffic applications are confronted with performance degradation, often the first course of action is to implement some flavor of data caching mechanism. The level of complexity needed to add a caching mechanism to an application tends to be low, so it’s a quick win that provides an immediate benefit with respect to scalability. At JBS, we’ve had success with implementing Redis ElastiCache nodes in AWS quickly and effectively, and as such it has become one of our standard approaches to ensuring our clients’ applications are responsive and scalable to business and traffic demands.
One thing to monitor, however, is the performance of the cache node itself. Once in place, it becomes very easy for developers to take caching operations for granted and start to (inadvertently) abuse the available functionality. As performance stabilizes after the introduction of a caching resource, e.g. a Redis cache node, development continues – and more application data finds its way into cache over time. Developers implement new methods and application behaviors that require the addition and manipulation of data in cache. Developers become complacent.
Then an Alarm Goes Off
On a recent project, a Redis ElastiCache node had been configured and integrated into an application’s resource stack in AWS. The Lambda API was running a Django app with Django REST Framework to handle incoming requests from clients, with django_redis serving as the cache backend used to communicate with the Redis node.
As incoming client traffic grew, the team noticed the cache node CPU utilization was steadily climbing. The initial reaction to this was to “scale up” and increase the node size within AWS during a planned maintenance window. However, after vetting the proposed node size increase in a dedicated performance testing environment, CPU utilization was completely unaffected and still spiking well beyond comfortable levels.

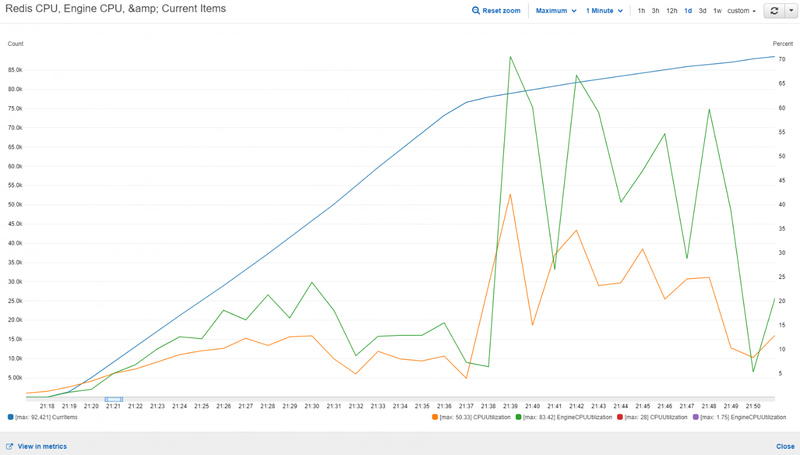
Figure 1: Performance test results of a single xlarge node show peak EngineCPUUtilization at 83%
On the surface, upgrading the cache node from “Large” to “XLarge” would provide an additional 2 CPU cores which is the concerning resource utilization metric. After analyzing the results of the performance test, it was clear that scaling up wouldn’t be beneficial – perhaps the issue was with the application throughput.
Note: Amazon recommends combining both the “CPU Utilization” and “Engine CPU Utilization” metrics to get the most accurate representation of your cache node’s CPU usage. See https://aws.amazon.com/about-aws/whats-new/2018/04/amazon-elastiCache-for-redis-introduces-new-cpu-utilization-metric-for-better-visibility-into-redis-workloads/ for more information.
Tests were conducted in which a second cache node was added. The second node’s responsibility was storing and returning application configuration settings, while the primary cache node was responsible for storing and returning API client responses. In this scenario, we saw almost no performance improvement. Back to the drawing board.
Deletes Were the Problem
Since attempts to scale up and scale out didn’t seem to have any measurable impact, the team turned inward and began auditing API caching operation code. Several small improvements were made to improve performance, such as:
- Installing hiredis and leveraging the HiredisParser class for improved performance and pipelining support
- Created a custom subclass of the django_redis DefaultClient that specifically created a client pipeline through which mass key deletions were executed
- Cache operations were moved to asynchronous tasks to offload pressure from Lambdas responsible for returning API responses to clients, but this doesn’t have an impact on cache performance (just API response time)
After making these incremental improvements to the underlying cache infrastructure, the team then began removing caching operations where possible. Namely, we suspected cache key invalidations (deletes) as the result of some client interactions were causing a “table scan” scenario – where Redis must inspect the entire cache key table to find matching keys to delete.
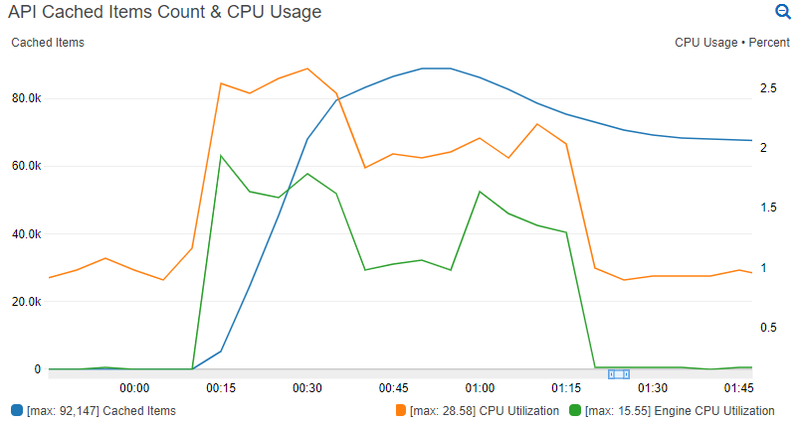
After removing all cache key deletes from the project code and re-running the performance test, the results proved the theory correct.

Figure 2: Performance test results on a large Redis cache node with no cache key deletions
Coping Without Deletes
With the mystery solved, the next challenge was: “How do we prevent users from seeing stale data in clients while still getting benefits from the cache node?”
Because of the way the application in question was designed, there were 2 groups of cached data: user-agnostic and user-specific. User-agnostic cache data was easy to deal with – it required no intervention, since its cached data depended on time-based expiration. All users see this data similarly within the client application. User-specific cache data was the problematic group, as certain user transactions were expected to invalidate cached items for that user to immediately reflect changes within the application client.
A solution was created that uses an embedded timestamp invalidation mechanism. In this solution, we store user-specific cache data with a timestamp to record when the cache key was built:
from datetime import datetime
 from django.core.cache import cache

def user_cache_set(key, data, cache_duration):
  cache.set(key, {
   'time': str(datetime.now()),
   'cached_data': data
  }, cache_duration)
Nothing too exciting is happening here. We’re only storing our data within a dictionary that has a timestamp key and data key, which gives us a simple “metadata” implementation. We could use this method in an API view that retrieves user order history, for example.
Next, we must take into consideration user operations or transactions that impact items already stored in cache. In our example, if a user places an order we would want the next load of the user’s order history to ignore the cached value and fetch the latest order. Since we know we cannot perform a cache key deletion due to performance concerns, we can record the time at which the user completed the action that should invalidate cache:
from datetime import datetime
 from django.core.cache import cache

def update_user_cache_timestamp(userid):
  cache.set(f'ua:{userid}', str(datetime.now()))
When a user performs any action that should invalidate their cache keys, the above will set the user’s “User Action Timestamp” cache key to the current time.
With that, we now have a way to store items in cache for a user and we know when the user has last completed an action that should cause our application to ignore any current items in cache for that user. Let’s wrap it all up with a method to retrieve information from cache for a user:
from dateutil.parser import parse

def user_cache_get(userid, key):
  try:
   user_last_action_time = parse(cache.get(f'ua:{userid}'))
  except (TypeError, ValueError):
   user_last_action_time = None

  cached_data = cache.get(key)

  if cached_data is None:
   return None

  try:
   data_cache_time = parse(cached_data['time'])
  except (IndexError, TypeError, ValueError):
   data_cache_time = None

  if data_cache_time and user_last_action_time and data_cache_time < user_last_action_time:
   return None

  try:
   return cached_data['cached_data']
  except (IndexError, TypeError):
   return cached_data
Walking through the logic of the cache retrieval method, we do the following:
- The “User Action Timestamp” for the user is retrieved from cache so we know when they last performed a cache-invalidation action within the application.
- We attempt to retrieve the requested data from cache with the given key.
- Functionality is similar to Django’s cache.get(), where None is returned if no data exists in cache.
- If data is found, we inspect its time metadata key to determine the age of the data.
- If the user has completed a cache invalidation action, and there’s data in cache, BUT the data in cache is older than our user’s action timestamp, return None and ignore the cached data.
- Otherwise, return cached data if available.
What happens in #5 above is the important bit; we “trick” our API view logic into rebuilding a cache key’s data by returning None if the cached data is older than our user’s last cache-breaking request. Having this method behave similarly to cache.get() means our developers only need to know when to use our built-in user cache methods, rather than how it all works under the covers.
Final Thoughts
The solution outlined here is by no means intended to be a “fire and forget” approach. A notable limitation is the assumption that all user cache keys should be invalidated after a cache-busting transaction, when that’s likely not the case. Additionally, there could be room for improvement or functional considerations in the method logic or the use of `dateutil.parser.parse()` and `datetime.datetime.now()`.
The important takeaway is that developers should always be aware of the potential performance impact cache operations can have. By slightly adjusting our approach to handling cache key invalidations, we were able to scale down a Redis node to a smaller size and still see a very sizable CPU performance improvement of over 95%.

The JBS Quick Launch Lab
Free Qualified Assessment
Quantify what it will take to implement your next big idea!
Our assessment session will deliver tangible timelines, costs, high-level requirements, and recommend architectures that will work best. Let JBS prove to you and your team why over 24 years of experience matters.


