An Introduction to Terraform with AWS
Terraform is a simple set of declarative scripts that allows a user to define and declare what a computer network should look like. You can define servers, routers, networks, permissions, and...
Opening the door to scaling infrastructure based on demand
Introduction
Today we’re going to be starting a dive into Terraform. What is Terraform? The fancy term is an “IaC” tool but that simply stands for “Infrastructure as Code”. Basically, Terraform is a simple set of declarative scripts that allows a user to define and declare what a computer network should look like. You can define servers, routers, networks, permissions, and a host of other possibilities. These computer networks exist on the Internet, or Cloud, where services like AWS, Azure, and others allow us to request a new server or network component whenever we want it. There are a lot of benefits to this, but for this article, we are going to focus on the pieces and how to get a basic Terraform script up and running.
For this first exercise, we’ll be creating a simple AWS Lambda and deploying it with Terraform. In the end, we’ll be able to log into AWS and see our new Lambda and even run the simple hello world program it contains. I’ll be working from the viewpoint of a Windows OS, but the steps should be very similar on other operating systems. There are a few prerequisites that I’ll first list here, and then we’ll go into how to install and test them to make sure they are working:
- Terraform - https://www.terraform.io/downloads.html
- AWS CLI - https://docs.aws.amazon.com/cli/latest/userguide/install-cliv2-windows.html
- This last one is optional, Visual Studio Code - https://code.visualstudio.com/Download
The Setup – Prerequisites and the boring important stuff
Terraform – download the latest version of Terraform from the link provided above. At the time of writing this, you will get a zip file with a terraform.exe file in it. Simply extract this somewhere on your local computer. I chose C:\Terraform\, but any folder would work. After you have downloaded Terraform and extracted it, you will want to add the folder path to the exe in your Windows PATH in your environment variables. The easiest way to get to this is to do the following:
- Open the Control Panel
- Select System
- Select System settings or Advanced system settings
- Click on the Environment Variables… button
- Select the Path variable and click Edit
- Add your path to the end of the list, in my case C:\Terraform\
AWS CLI – download the latest version of the AWS CLI from the link provided above. You should be able to run the MSI installer and then follow the prompts through to install. The path for this one should be set up during the installation.
Visual Studio Code – VS Code is a great editor that is very popular in the development community, but really any notepad or editor can work. There are some nice plugins for Terraform that do help with highlighting and editing in VS Code.
Next, let’s test Terraform and the AWS CLI! Go ahead and open a command prompt. If you already had one open, be sure to close it and open a new one, as some of the PATH and installation settings may not register if the command window was already open. You should be able to run aws --version and terraform --version to verify that they are both installed.
Create AWS Credentials – The last step before we get going is to set up your AWS credentials that we will be using. This will specify which account you will be accessing in AWS, and it will also need to have sufficient permissions to add the resources in terraform. For learning purposes, it may be easiest to use some kind of admin in a test or sandbox account. We will get more into security more in a future post. For now, open a command window and type aws configure. It should look like the following below, substitute any changes for your account, like the key, secret key, and if you are using a different region:
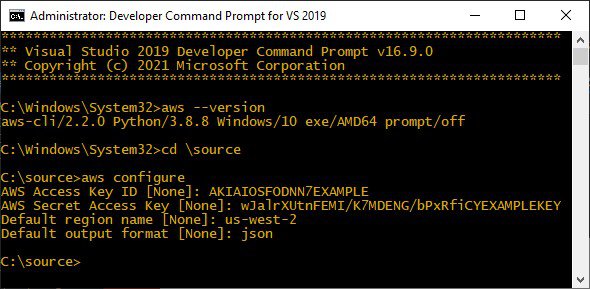
An Introduction to Terraform with AWS
After that is done you can navigate to the user folder of the Windows user you are currently logged in with. You will see some default files that have been created for you in a .aws folder. My full path looks like C:\Users\andre_gdekeeq\.aws. The two files are credentials and config (notice there is no file extension on them):
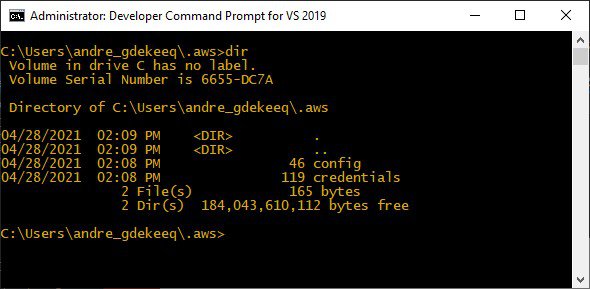
An Introduction to Terraform with AWS
When we are using Terraform and AWS now the system will use the account and settings found in those files. For information on the .aws folder files and settings check out Amazon’s documentation here:
https://docs.aws.amazon.com/cli/latest/userguide/cli-configure-files.html
The Good Stuff – Creating an AWS lambda with Terraform
Now that we have all of the setup out of the way, let’s get going with Terraform! The first thing we are going to do is pick a folder, any folder doesn’t really matter. It is just going to be the folder we keep our terraform files and lambda files in. The first file we want to create in that directory is Main.tf. This is the typical name of the main terraform file. After you create it go ahead and paste in the following code for starters:
terraform {
  required_providers {
    aws = {
      source  = "hashicorp/aws"
      version = "~> 3.27"
    }
  }

  required_version = ">= 0.14.9"
}

provider "aws" {
  profile = "default"
  region  = "us-west-2"
}
resource "aws_iam_role" "iam_for_lambda" {
  name = "iam_for_lambda"
assume_role_policy = <<EOF
{
  "Version": "2012-10-17",
  "Statement": [
    {
      "Action": "sts:AssumeRole",
      "Principal": {
        "Service": "lambda.amazonaws.com"
      },
      "Effect": "Allow",
      "Sid": ""
    }
  ]
}
EOF
}
resource "aws_lambda_function" "test_lambda" {
  filename      = "myLambda.zip"
  function_name = "myLambda"
  role          = aws_iam_role.iam_for_lambda.arn
  handler       = "myLambda.handler"
  runtime = "nodejs12.x"
}
Let’s break down the pieces on this guy:
- required_providers – This is the piece that is telling Terraform what cloud service we are using. In our case it’s AWS. It could be Azure or a different provider.
- provider – This is the information for accessing the AWS service we’ll be deploying too. The profile = “default” is referencing the entry that was created in the credentials in the .aws folder. If the name of your entry in the credentials file is different, you’ll want to change it to match here.
- resource “aws_iam_role” “iam_for_lambda” – this is the security permissions or AWS role for the lambda. The iam_for_lambda will be the name of the created role. We’re not going to dive into the specifics in this article, but this is wide open access that should make it easy for testing and an initial setup. We’d want to get more specific for an actual production destined Lamda.
- resource “aws_lambda_function” “test_lambda” – here’s what we’ve been working towards. The lambda itself. Here’s a more granular breakdown of the pieces:
- The name of the lambda will be test_lambda as shown in the resource tag
- filename – the code to be deployed will be a zip file called myLambda.zip.
- function_name – The function file name we’ll be creating in the code will myLambda.
- role – this is linking to the lambda to the role that we created above
- handler – this is the entry point in the code the lambda will be using, myLambda.handler
- runtime – we can specify what language/version here, we’ll be using nodejs12.x
That’s a very basic Terraform file. Not a lot going on, but a good starting place to get our feet wet. Now let’s get a simple lambda that we can use to deploy and test. Create another file in the same folder and call it myLambda.js. Go ahead and paste the following code in:
exports.handler = async function(event, context) {
  return { message: 'Hello from your little lambda.'};
}
This is about as simplistic as you can get. We’re going to return a little JSON object version of hello world. While this is simple, technically any code can be deployed this way. The skies the limit! For now, we’re keeping it simple to focus on our first Terraform deployment.
In a full-scale system, we’d probably have a ci/cd pipeline creating a zip file for code deployment, but for the sake of simplicity, we’re just going to do it ourselves. Navigate to the myLambda.js file and zip it up to create a myLamda.zip file in the same folder as the rest of it. This file is the match for the filename entry in our Main.tf file. Terraform will grab the zipped-up code we’ve supplied and supply it as the code for the new lambda.
That should be all of the set up we need! Let’s actually get this little lambda deployed to AWS!
The finale! – Deploying with Terraform
Now that we have all of the pieces we are ready to pull the trigger and deploy our terraform infrastructure, our lambda, to AWS. To do so we are going to want to open a command window and navigate to our folder where we’ve been placing everything so far.
The first command we are going to want to run is terraform init. This gets everything ready to start tracking the pieces and deploying our infrastructure:
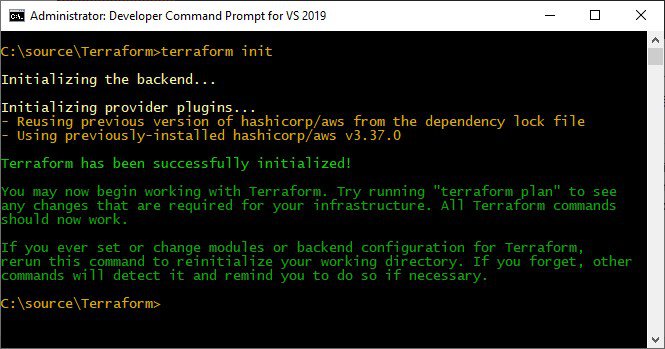
An Introduction to Terraform with AWS
After that’s done we’ll want to toss out a quick terraform plan. Think of this as your compiling step. You should get a heads up of any errors and terraform will give you a heads up of what it will be adding or removing. This can be a big deal. Remember we are literally deploying servers and network systems here. While epically cool, accidentally missing a production server that is about to be deleted is epically bad. The output of terraform plan should look something like this:
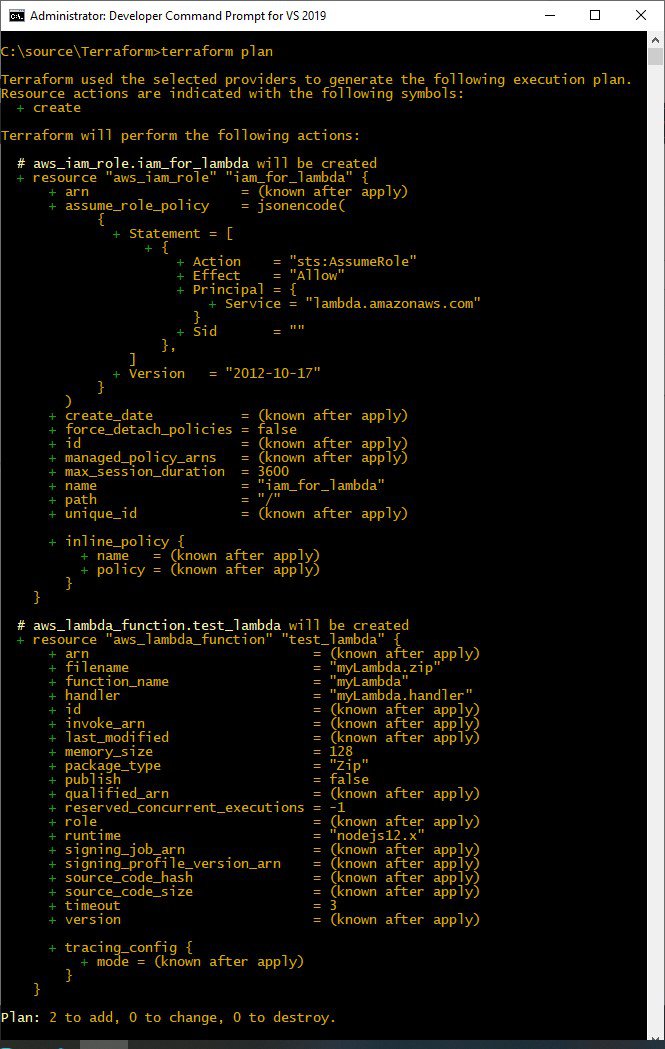
An Introduction to Terraform with AWS
There’s a lot of pieces going on, but most of it can be ignored unless you are really getting into the specifics. The biggest part is to look for the green plus signs, or in the case of removing something the red minus signs. We want to be sure we are adding what we expect and removing what we expect; no more and no less.
If everything looks good we want to go ahead and run terraform apply as our last command. This will take whatever was in the plan and actually start deploying it to AWS. The system will show the planned output again, another hint to make sure it all looks good, and then ask for us to type yes to begin the process. Go ahead and type out y-e-s and hit the enter button. You’ll see the following:
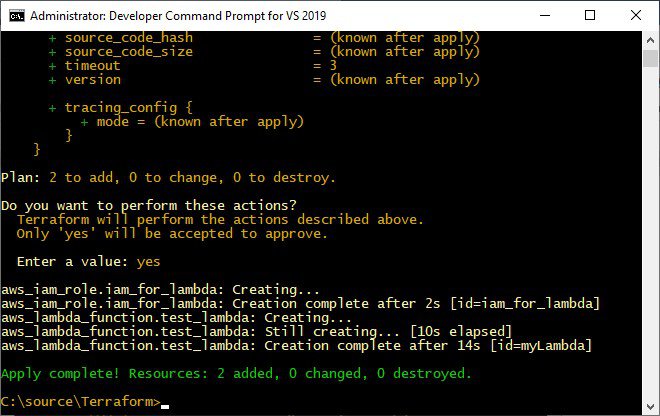
An Introduction to Terraform with AWS
And that’s it! You can log into AWS and view the new lambda. This was a very basic introduction to Terraform, but this is just the beginning. The power between Terraform and paired Cloud Service like AWS or Azure is a real game-changer. It opens the door to begin scaling infrastructure based on demand. Either adding more hardware when needed or reducing it in downtime to save money.
We also have a documented version of our infrastructure in our code base, so we know exactly what the setup looks like. The fun part starts now, what could you do with Terraform and how could it benefit you and your company?

The JBS Quick Launch Lab
Free Qualified Assessment
Quantify what it will take to implement your next big idea!
Our assessment session will deliver tangible timelines, costs, high-level requirements, and recommend architectures that will work best. Let JBS prove to you and your team why over 24 years of experience matters.


